How to properly clean your hair brushes ? We won’t judge you if cleaning your hairbrush isn’t exactly at the top of your to-do list, since we understand why that would be the case. But here’s the deal: it’s definitely a beauty task that’s worth putting in the effort. When you clean your hairbrush on a regular basis, you may remove the debris, product residue, and oils from your scalp that have accumulated on the bristles over the course of time. After all, the last thing you want is for the filth and crud to find its way back onto your freshly washed hair.
In addition to this, making sure that your brush is clean on a regular basis can help it function more effectively. When hair becomes caught between the bristles of a brush, it may prevent the brush from functioning at its optimal level and preventing it from doing the task for which it was designed. What’s the upbeat report? It doesn’t matter what sort of hairbrush you have; the procedure of cleaning it doesn’t have to be difficult or time-consuming at all. This article will show you how to swiftly and effectively clean a comb or a hairbrush.
How Often to Clean a Hairbrush ?
The majority of hairbrushes and combs only need a thorough cleaning once per month. It’s possible that you’ll need to clean the equipment once every two weeks if you have really long hair or use a lot of style products. Although if you do not even give the brush a complete cleaning every so often, it’s still a good idea to give it a quick once over to remove any tangled hair from around the bristles.
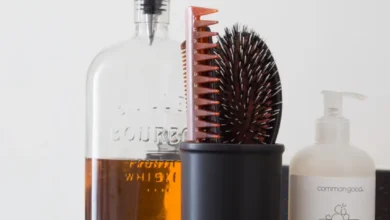
What You’ll Need:
- You are going to need a pintail comb.
- Tweezers
- Toothbrush Shampoo that is mild and does not include any additional conditioners
- Isopropyl alcohol
- Spray for sterilization
- Baking soda
- a commode or a bowl
- Towel
How to properly clean your hair brushes ?
The procedure for cleaning a hairbrush changes depending on the kind of brush that has to be cleaned. Brushes with synthetic (plastic) bristles and handles are the simplest to clean, but brushes with organic bristles or wooden handles require more specific attention and a greater degree of caution.
Hairbrushes With Synthetic Bristles and Handles
These methods are effective when used with brushes that have any sort of synthetic bristles or handle, including cushioned and paddle brushes.
- Take care of the hair. To begin, remove as much excess hair from the bristles of the brush as you can by using the end of a pintail comb, your fingers, or a pair of tweezers.
- Clean the brush in water. Warm water should be added to either the sink in the bathroom or a big bowl. To produce some suds, add a fair amount of shampoo—roughly equivalent to two teaspoons—to the container, then swirl the brush around in the mixture.
- Let it soak. You have the option of letting the brush soak for ten minutes or beginning the cleaning process immediately. Scrub the areas in between the rows of bristles and the handle of the toothbrush with a clean toothbrush.
- Scrub with baking soda. If you notice an excessive buildup of hair products, continue scrubbing while dipping the wet toothbrush in some dry baking soda in between strokes. Baking soda will serve the purpose of removing the muck by acting as a mild abrasive.
- Perform a thorough washing. After giving the brush a thorough washing in warm water, shake it to remove any surplus liquid. To dry it, lay it out on a towel with the bristles facing down.
- Clean and disinfect the brush. Combine the water and isopropyl alcohol at a ratio of 1 to 1. After dipping the brush in the solution, lay it on a towel with the bristles facing down so that it may dry naturally.
Natural-Bristle Hairbrushes
The use of a hairbrush with natural bristles, as opposed to one with synthetic bristles, costs more money but promises to make the hair more manageable and shiny. Boar bristles are often fixed on a hardwood grip and are regarded to be of the highest quality among other types of bristles.
- Keep hold of the hair. To begin, remove as much excess hair from the bristles of the brush as you can by using the end of a pintail comb, your fingers, or a pair of tweezers.
- Clean the bristles with water. Warm water and about one teaspoon of mild shampoo should be mixed together in a dish that is not too deep and is broad enough to immerse the bristles but not the handle. Put the hairbrush over the bowl in such a way that just the bristles are immersed in the water. Ten minutes should be allowed for the bristles to absorb the liquid.
- Put away the brush and, using your hands, work the sudsy mixture between the rows of the bristles, being careful to get all the way down to the bottom.
Clean the brush with water. Immediately run the brush under some warm running water to quickly clean it, and then lay it out to dry with the bristles facing down on a towel. - Clean and disinfect the brush (optional). If you believe that the brush needs to be sterilized, give it a gentle misting with a disinfectant spray such as Lysol in order to eliminate any germs that may be present. You shouldn’t use isopropyl alcohol since it might cause the organic bristles on the brush to dry out.
Hairbrushes With a Wooden Handle
The bristles on hairbrushes with wooden handles may be organic, synthetic, or a combination of the two. In contrast to their plastic counterparts, the handles of wooden hairbrushes should never be submerged in water. The water may hasten the deterioration of the wood, and it can also cause the bristles to become more disorganized. Once your wooden hairbrush has been wet, you should never dry it using the high heat from a hairdryer. If you have no choice, dry the wood in cold air, but you may also just let it air dry.
If somehow the handle has an extensive buildup of hair product residue, you may remove any residue by dipping a toothbrush in soapy water and giving it a quick scrape. After cleaning the handle with a fresh cloth, lay it flat with the bristles facing down so that it may dry naturally.